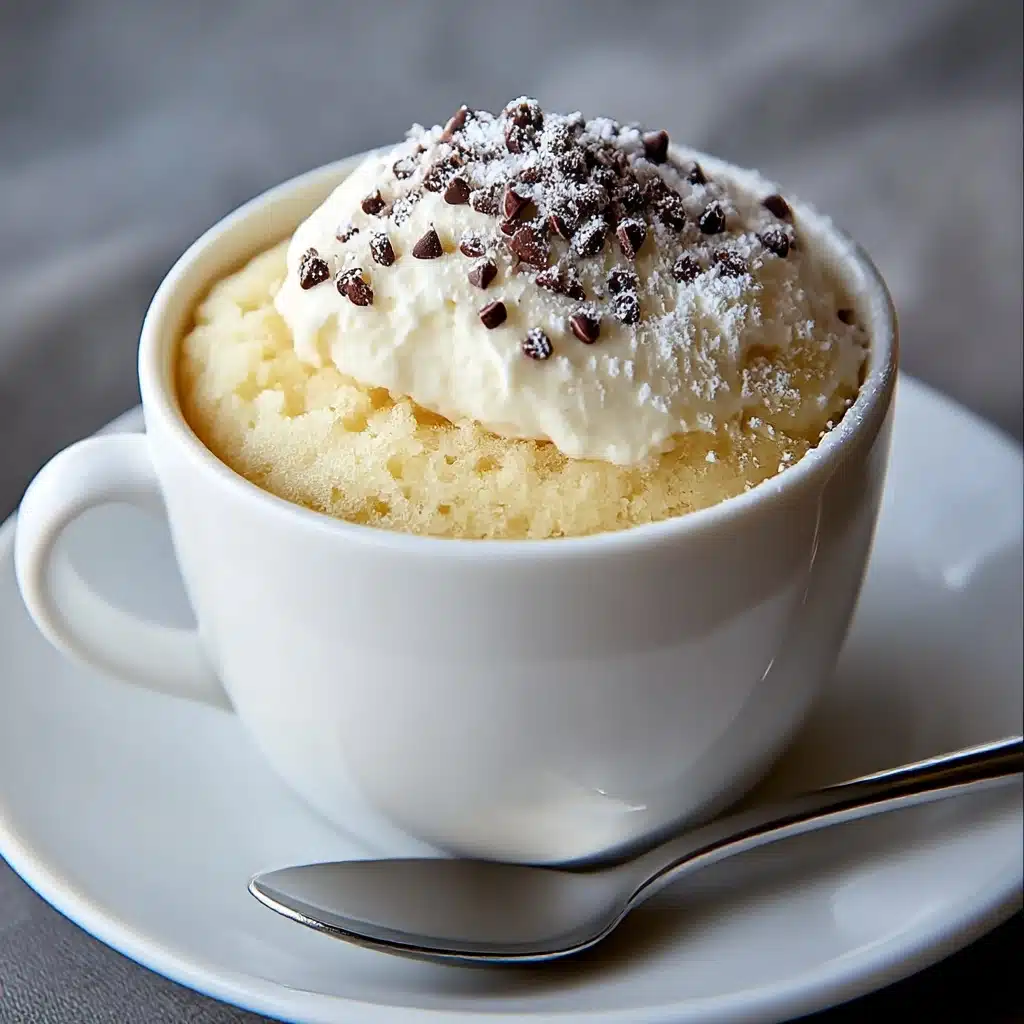
Vanilla Mug Cake Recipe
If you’re craving a quick and irresistible treat that feels like a warm hug, this Vanilla Mug Cake is your new best friend. Perfect for when you want dessert without the hassle, this single-serving cake is bursting with classic vanilla flavor and a tender, moist crumb. The best part? It’s ready in just minutes using simple pantry staples. Whether you need a last-minute sweet fix or a charming little indulgence, this Vanilla Mug Cake delivers comfort and joy in every bite.
Ingredients You’ll Need
The beauty of this Vanilla Mug Cake lies in its simplicity. Each ingredient plays a crucial role in creating a delicate texture and rich flavor, making this recipe both accessible and satisfying.
- All-purpose flour: Provides structure and a soft crumb to the cake.
- Granulated sugar: Sweetens the cake and helps create a tender texture.
- Baking powder: The leavening agent responsible for that lovely rise.
- Salt: Enhances the overall flavor and balances sweetness.
- Milk: Adds moisture and a creamy consistency to the batter.
- Vegetable oil: Keeps the cake moist and tender, preventing it from drying out.
- Vanilla extract: The star flavor that turns this cake into a fragrant, comforting treat.
How to Make Vanilla Mug Cake
Step 1: Mix Dry Ingredients
Start by combining the all-purpose flour, granulated sugar, baking powder, and salt directly in a 12-ounce coffee mug. Stir these together to ensure the leavening is evenly distributed, which helps the cake rise uniformly while baking.
Step 2: Add Wet Ingredients
Next, pour in the milk, vegetable oil, and vanilla extract. Stir everything together until the batter is perfectly smooth and free of lumps. This step is key to achieving that lovely, tender crumb that makes the vanilla mug cake so delightful.
Step 3: Microwave the Cake
Place your mug in the microwave and cook on high for about 90 seconds. You’ll notice the cake rising to the top as it bakes, and it should feel firm but springy to the touch when done. Be careful not to overcook, or the cake can become dry.
Step 4: Cool and Enjoy
Allow the cake to cool for a couple of minutes before digging in. This gives it a chance to set and reveal its tender texture. You can enjoy it right from the mug or gently invert it onto a plate for a slightly fancier presentation.
How to Serve Vanilla Mug Cake
Garnishes
Simple additions can elevate your Vanilla Mug Cake beautifully. A light dusting of powdered sugar adds a delicate sweetness and pretty finish, while a scoop of vanilla ice cream transforms it into an indulgent dessert. Fresh berries or a drizzle of chocolate sauce can also bring color and extra flavor to the plate.
Side Dishes
This Vanilla Mug Cake pairs wonderfully with a warm cup of coffee or tea, making it an ideal afternoon pick-me-up. For a bit of texture contrast, serve alongside whipped cream or crunchy nuts, which complement the cake’s soft and airy texture.
Creative Ways to Present
For a fun twist, try layering your vanilla mug cake with fruit preserves or peanut butter before microwaving. You can also add chocolate chips or sprinkles to the batter for extra bursts of flavor. Serving it in a clear mug shows off its golden color and enticing texture, adding charm to your dessert presentation.
Make Ahead and Storage
Storing Leftovers
If you have any leftover Vanilla Mug Cake (though that’s rare!), store it in an airtight container at room temperature for up to 24 hours. Beyond that, the cake may start to dry out or lose its freshness.
Freezing
Freezing is not recommended for the Vanilla Mug Cake, as its delicate texture can become rubbery or dry after thawing. It’s really best enjoyed fresh and warm straight from the microwave.
Reheating
If your cake cools down too much, simply microwave it for 10 to 15 seconds to bring back that freshly-baked warmth and softness. Avoid overheating to keep it moist and tender.
FAQs
Can I use almond milk or another milk alternative?
Absolutely! Almond milk, soy milk, or oat milk all work wonderfully in this Vanilla Mug Cake recipe and add their own subtle flavors without compromising texture.
Is it possible to make this recipe gluten-free?
Yes, you can substitute the all-purpose flour with a gluten-free baking blend. Just make sure the blend contains xanthan gum or another binder to help the cake hold together properly.
How can I make the cake less sweet?
You can reduce the sugar slightly if you prefer a less sweet treat. Decreasing it by half a tablespoon to a tablespoon won’t affect the structure but will make the sweetness more subtle.
What if my cake sinks in the middle after cooking?
This usually happens if the cake is undercooked or if the microwave wattage varies. Try cooking in 15-second increments after 90 seconds until the cake feels firm but not dry.
Can I double the recipe to make two servings at once?
Yes! Just make sure to use a larger mug or separate mugs, and adjust the cooking time slightly. Two mugs side by side will generally need about 2 minutes in the microwave.
Final Thoughts
This Vanilla Mug Cake is a delightful little secret for dessert lovers looking for something quick, easy, and utterly delicious. It’s the perfect cozy treat to brighten your day or impress guests with minimal effort. I can’t wait for you to make it and enjoy the warm vanilla goodness in just minutes—your taste buds will thank you!
PrintVanilla Mug Cake Recipe

This quick and easy Vanilla Mug Cake is perfect for satisfying your sweet tooth in just minutes. Made with simple pantry ingredients, it’s a single-serving treat cooked in the microwave, delivering a moist and fluffy vanilla-flavored cake without the need for an oven or elaborate preparation.
- Prep Time: 5 minutes
- Cook Time: 1 minute 30 seconds
- Total Time: 6 minutes 30 seconds
- Yield: 1 serving 1x
- Category: Dessert
- Method: Microwave
- Cuisine: American
- Diet: Vegetarian
Ingredients
Dry Ingredients
- 1/4 cup all-purpose flour
- 2 tablespoons granulated sugar
- 1/4 teaspoon baking powder
- 1/8 teaspoon salt
Wet Ingredients
- 1/4 cup + 1 tablespoon milk
- 2 tablespoons vegetable oil
- 1/2 teaspoon vanilla extract
Instructions
- Mix Dry Ingredients: In a 12 oz coffee mug, combine the all-purpose flour, granulated sugar, baking powder, and salt. Stir these together to evenly distribute the leavening agent and salt throughout the flour and sugar.
- Add Wet Ingredients: Pour in the milk, vegetable oil, and vanilla extract into the mug. Mix thoroughly until the batter is smooth and free of lumps, ensuring all dry ingredients are incorporated.
- Microwave: Cook the mug cake in the microwave on high power for about 90 seconds. The cake should rise to the top and feel firm to the touch when done. Be careful not to overcook to maintain a moist texture.
- Cool and Garnish: Let the cake cool for a few minutes inside the mug to set properly. You can eat it straight from the mug or invert it gently onto a plate. For an extra special treat, dust with powdered sugar or add a scoop of vanilla ice cream on top.
Notes
- Use a microwave-safe mug of at least 12 oz capacity to prevent overflow during cooking.
- Cooking times may vary depending on the microwave’s wattage; adjust by 10-15 seconds as needed.
- For a dairy-free version, substitute milk with almond or oat milk.
- To add texture, try mixing in chocolate chips or chopped nuts before microwaving.
- Allow the cake to cool slightly to avoid burns, as it will be very hot right out of the microwave.
Nutrition
- Serving Size: 1 mug cake (about 130g)
- Calories: 330 kcal
- Sugar: 14 g
- Sodium: 180 mg
- Fat: 14 g
- Saturated Fat: 2 g
- Unsaturated Fat: 12 g
- Trans Fat: 0 g
- Carbohydrates: 45 g
- Fiber: 1 g
- Protein: 4 g
- Cholesterol: 5 mg
Keywords: vanilla mug cake, quick dessert, microwave cake, single serving cake, easy vanilla cake