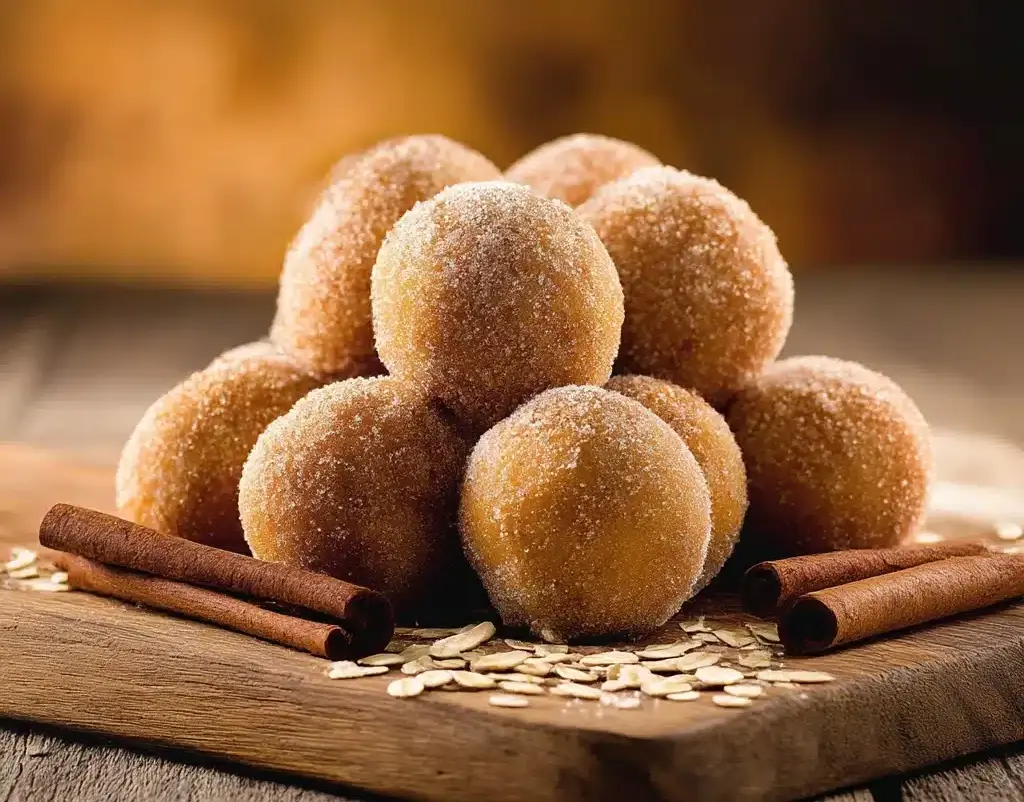
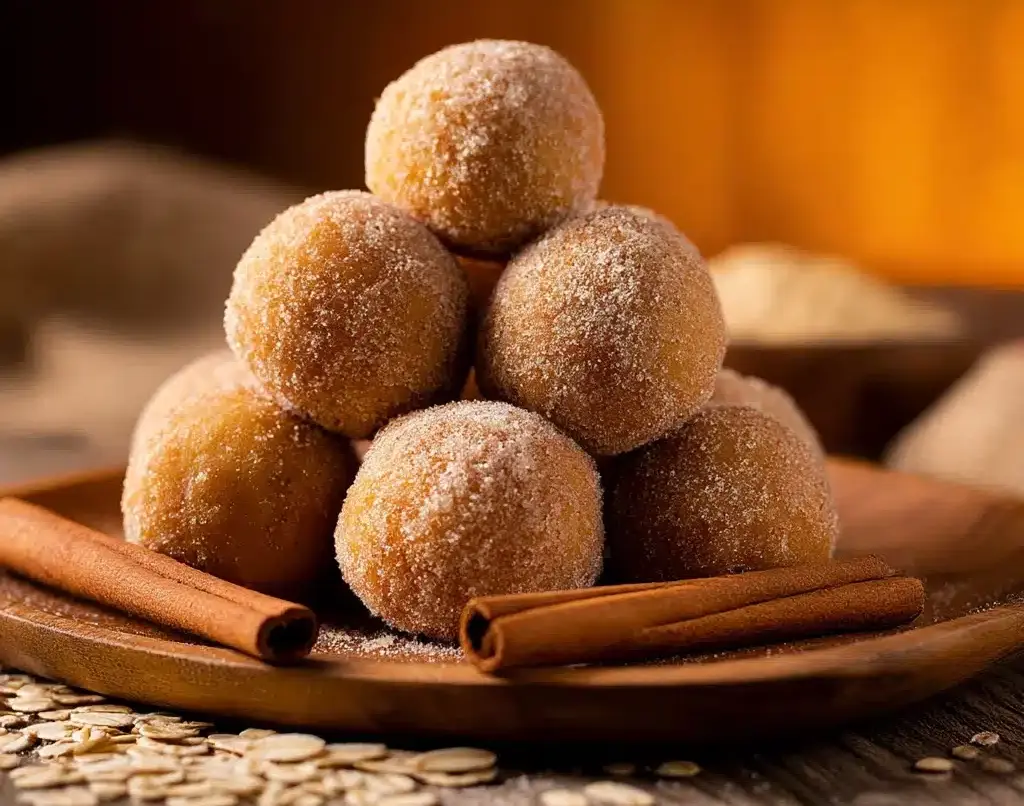
Snickerdoodle Protein Balls Recipe
If you are on the hunt for a snack that feels like a sweet treat yet fuels your body with wholesome goodness, these Snickerdoodle Protein Balls are an absolute game changer. Bursting with warm cinnamon flavor and a delightful hint of vanilla, each bite delivers the cozy nostalgia of a classic snickerdoodle cookie paired with the satisfying punch of protein to keep you energized throughout the day. Perfect for a quick grab-and-go snack or a post-workout boost, these Snickerdoodle Protein Balls blend simple, nourishing ingredients into little rounds of pure joy.
Ingredients You’ll Need
This recipe shines because of how straightforward the ingredients are, yet how essential each one is to building that beloved Snickerdoodle Protein Ball flavor and texture. From the hearty oat flour providing a chewy base to the cinnamon that brings those classic snickerdoodle vibes, every component plays a starring role.
- 1 cup oat flour: Gives a wholesome, slightly nutty texture and acts as the perfect base for the balls.
- 1/2 cup vanilla protein powder: Adds a creamy sweetness and a protein boost that makes these balls truly nourishing.
- 2 tablespoons almond butter: Brings richness and helps bind the mixture while infusing a subtle nutty flavor.
- 2 tablespoons maple syrup or honey: Sweetens naturally with a touch of moisture to keep the dough tender.
- 1 teaspoon vanilla extract: Enhances the flavor depth with smooth, aromatic warmth.
- 1 teaspoon ground cinnamon: The key spice to deliver that iconic snickerdoodle taste everyone loves.
- Pinch of sea salt: Balances sweetness and enhances all the flavors.
- Optional: 1-2 tablespoons almond milk: Helps adjust dough consistency for easier shaping if needed.
- For the cinnamon-sugar coating: 2 tablespoons granulated sweetener (like coconut sugar or erythritol) mixed with 1/2 teaspoon ground cinnamon to give each protein ball that irresistible sweet-spicy finish.
How to Make Snickerdoodle Protein Balls
Step 1: Mix the Dry Ingredients
Start by combining the oat flour, vanilla protein powder, ground cinnamon, and a pinch of sea salt in a large mixing bowl. Stir these dry ingredients well so every bit of flour and cinnamon is evenly distributed, creating the flavorful foundation for our balls.
Step 2: Add the Wet Ingredients
Next, add in your almond butter, maple syrup (or honey), and vanilla extract. Use a spoon or your hands to mix these thoroughly into the dry base. You’ll notice the mixture starting to come together into a dough-like consistency that’s ready for shaping.
Step 3: Adjust the Consistency
If the dough feels too dry or crumbly, this is where the optional almond milk comes in handy. Add it one tablespoon at a time, mixing gently, until the dough holds together enough to be rolled into balls without falling apart.
Step 4: Shape the Balls
Pinch off about a tablespoon of dough at a time and roll it between your palms until you have a smooth, compact ball. Repeat this process with the entire batch of dough, enjoying the tactile stage where the snack truly starts to take form.
Step 5: Prepare and Apply the Cinnamon-Sugar Coating
In a small bowl, mix the granulated sweetener with ground cinnamon for that signature snickerdoodle finish. Roll each protein ball in this mixture until evenly coated, ensuring every bite will carry that nostalgic cinnamon-sugar crunch on the outside.
Step 6: Chill and Enjoy
Place your freshly rolled and coated Snickerdoodle Protein Balls in the refrigerator for at least 20 minutes. Chilling helps them firm up and meld the flavors together. Once firm, they are ready to enjoy as a delicious, guilt-free treat!
How to Serve Snickerdoodle Protein Balls
Garnishes
For an extra pop of color and texture, try sprinkling a few crushed toasted almonds or a light drizzle of melted dark chocolate over each Snickerdoodle Protein Ball. These simple garnishes elevate the snack when serving to guests or just making your treat feel extra special.
Side Dishes
Pair these protein balls with a refreshing glass of almond milk or a hot cup of chai tea to complement and enhance the warm cinnamon and vanilla flavors. They also work wonderfully alongside a fruit salad or a bowl of Greek yogurt for a balanced snack or light breakfast.
Creative Ways to Present
Want to impress your friends or family? Present your Snickerdoodle Protein Balls on a rustic wooden board, garnished with fresh cinnamon sticks and edible flowers. For a fun party option, serve them in decorative mini cupcake liners arranged in a colorful tin or box, making them perfect for gifting or on-the-go snacking.
Make Ahead and Storage
Storing Leftovers
Your Snickerdoodle Protein Balls will keep well in an airtight container stored in the refrigerator, staying fresh and flavorful for up to one week. This makes them a fantastic prep-ahead snack you can rely on throughout busy days.
Freezing
If you want to keep these protein balls around longer, simply freeze them in a single layer on a parchment-lined tray until solid, then transfer to a freezer-safe container or bag. They freeze beautifully and can last up to three months without losing their texture or flavor.
Reheating
Since these are enjoyed cold or at room temperature, there’s no need for reheating. Just let frozen balls thaw in the fridge overnight before enjoying them as a quick pick-me-up that tastes just as fresh as day one.
FAQs
Can I use a different nut butter?
Absolutely! Peanut butter, cashew butter, or even sunflower seed butter work well if you have a preference or allergy. Just keep in mind that the flavor and texture might shift slightly depending on the choice.
Are Snickerdoodle Protein Balls gluten-free?
Yes, as long as you use certified gluten-free oat flour and protein powder, these protein balls are naturally gluten-free, making them suitable for those with gluten sensitivities.
What type of protein powder works best?
Vanilla-flavored whey or plant-based protein powders are best for this recipe because they complement the cinnamon and vanilla well without overpowering the other flavors.
Can I make these balls without sweetener?
You could try reducing or omitting the sweetener, but since the cinnamon-sugar coating adds a signature touch, the balls might lose some of their classic snickerdoodle charm. A little sweetness helps balance the spices perfectly.
How do I make the dough less sticky?
If your dough is too sticky to handle, chill it in the fridge for 10-15 minutes before shaping the balls. This firms it up and makes rolling much easier.
Final Thoughts
If you’re craving a snack that’s both indulgent in flavor and packed with good-for-you ingredients, I wholeheartedly recommend giving these Snickerdoodle Protein Balls a try. They combine the nostalgic warmth of a classic cookie with the energy boost of protein in such a delightful package that you’ll find yourself reaching for them again and again. Trust me, once you make a batch, they’ll quickly become one of your favorite go-to snacks.
“`
PrintSnickerdoodle Protein Balls Recipe

Delightfully soft and chewy Snickerdoodle Protein Balls combine the nostalgic flavors of cinnamon and vanilla with a healthy boost of protein, making them a perfect guilt-free snack for on-the-go energy or post-workout fuel.
- Prep Time: 10 minutes
- Cook Time: 0 minutes
- Total Time: 30 minutes (including chilling time)
- Yield: 12–14 protein balls 1x
- Category: Snack
- Method: No-Bake
- Cuisine: American
- Diet: Vegetarian
Ingredients
Main Ingredients
- 1 cup oat flour
- 1/2 cup vanilla protein powder
- 2 tablespoons almond butter
- 2 tablespoons maple syrup or honey
- 1 teaspoon vanilla extract
- 1 teaspoon ground cinnamon
- Pinch of sea salt
- Optional: 1-2 tablespoons almond milk
Cinnamon-Sugar Coating
- 2 tablespoons granulated sweetener (such as coconut sugar or erythritol)
- 1/2 teaspoon ground cinnamon
Instructions
- Mix the dry ingredients: In a large mixing bowl, combine the oat flour, vanilla protein powder, ground cinnamon, and a pinch of sea salt. Stir well to ensure all dry components are evenly incorporated.
- Add the wet ingredients: Add almond butter, maple syrup or honey, and vanilla extract to the dry mixture. Stir thoroughly until the mixture begins to come together into a dough.
- Adjust the consistency: If the dough feels too dry or crumbly, gradually add almond milk one tablespoon at a time, mixing until the dough becomes moldable and holds together.
- Shape the balls: Use a tablespoon to scoop portions of the dough, then roll each portion between your palms to form smooth, round balls. Continue until all the dough is used.
- Prepare the coating: In a small bowl, mix the granulated sweetener and ground cinnamon. Roll each protein ball gently in the cinnamon-sugar mixture to evenly coat them.
- Chill and enjoy: Place the coated protein balls on a tray or plate and refrigerate for at least 20 minutes to firm up. Store them in an airtight container in the refrigerator for up to one week, or freeze for longer preservation.
Notes
- You can substitute almond butter with peanut butter or another nut butter of your choice.
- Maple syrup adds a richer flavor, but honey works equally well as a natural sweetener.
- If you prefer a vegan version, make sure to use a plant-based protein powder and maple syrup instead of honey.
- Feel free to customize the spice blend by adding a pinch of nutmeg or ground ginger for extra warmth.
- Rolling the balls in shredded coconut or crushed nuts is a tasty alternative to the cinnamon-sugar coating.
Nutrition
- Serving Size: 1 protein ball (approx. 25g)
- Calories: 110
- Sugar: 4g
- Sodium: 50mg
- Fat: 5.5g
- Saturated Fat: 0.5g
- Unsaturated Fat: 5g
- Trans Fat: 0g
- Carbohydrates: 10g
- Fiber: 2g
- Protein: 6g
- Cholesterol: 0mg
Keywords: snickerdoodle protein balls, healthy snack, no-bake snack, protein bites, cinnamon protein balls, vegan snack, gluten-free snack