Delicious Dairy-Free Red Velvet Brownies Recipe
Introduction
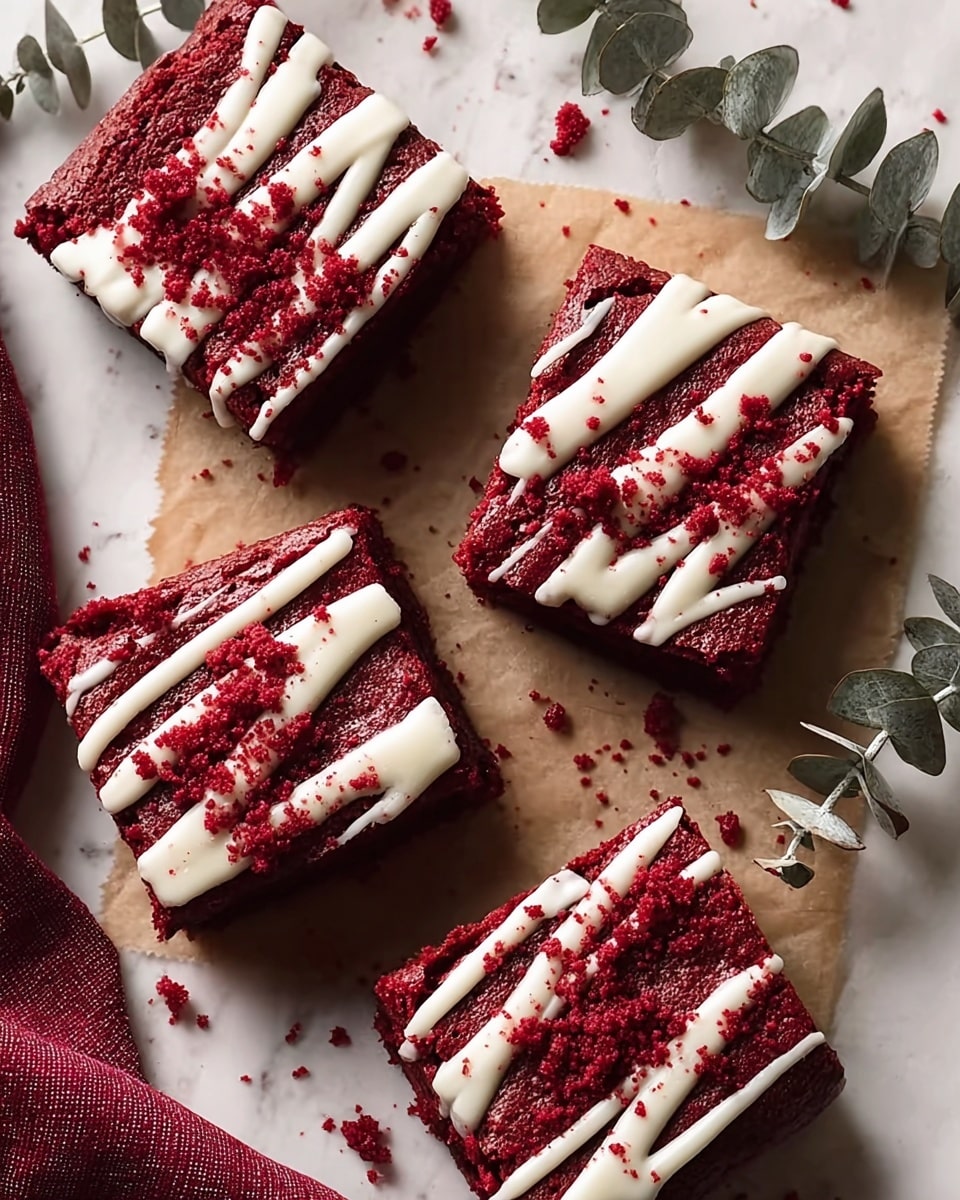
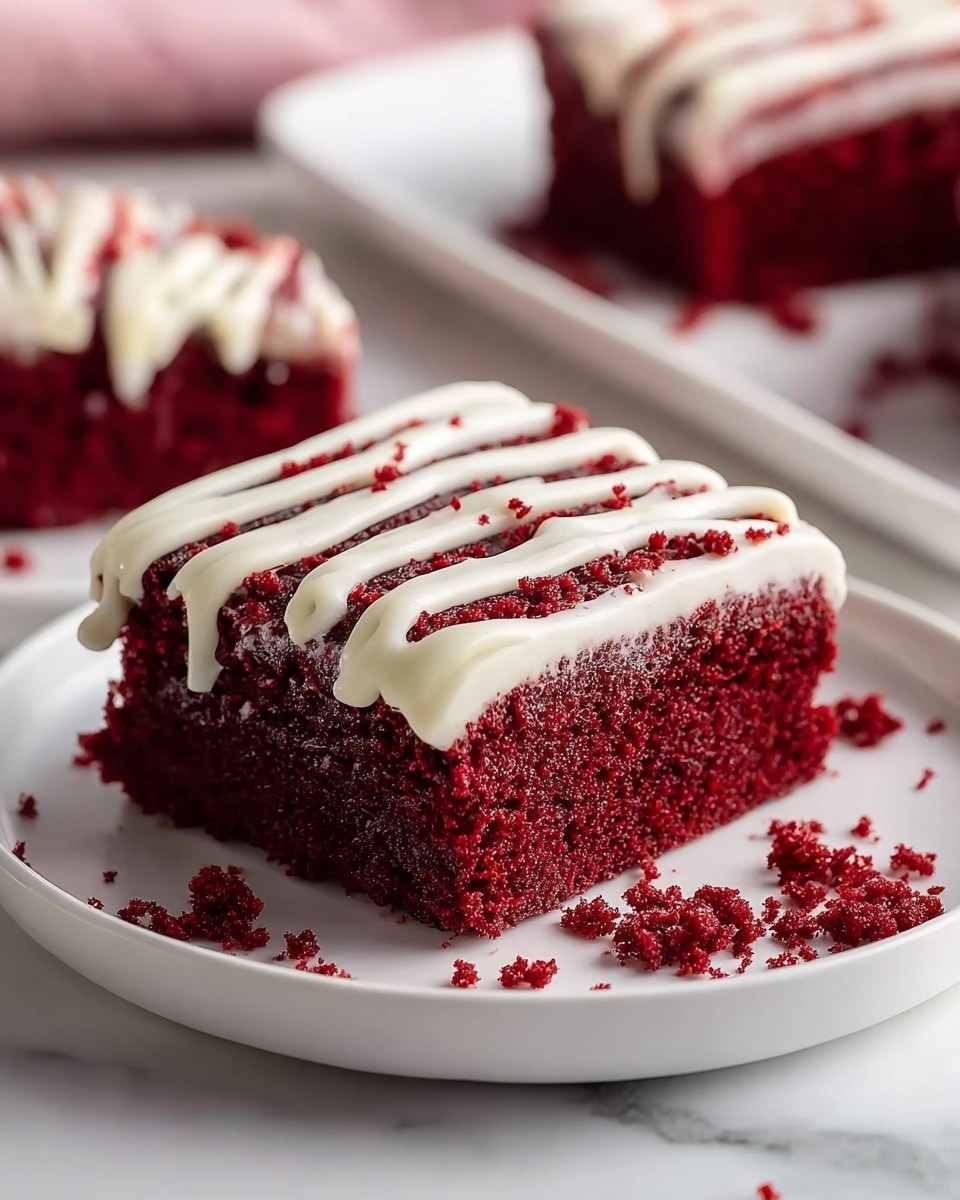
These delicious dairy-free red velvet brownies combine a rich, fudgy texture with vibrant color and a tangy vegan cream cheese glaze. Perfect for anyone looking for a dairy-free treat that still delivers on flavor and indulgence.
Ingredients
- 3/4 cup vegetable oil
- 1 1/2 cups sugar
- 2 1/2 tsp vanilla essence (preferably Nielsen-Massey)
- 1 tbsp apple cider vinegar
- 2 tbsp red food coloring
- 3 eggs (room temperature, about 70°F)
- 1 3/4 cups flour (King Arthur all-purpose flour recommended)
- 5 tbsp cocoa powder
- 1/2 tsp salt
- 1/2 tsp espresso powder
- For the glaze:
- 3.5 oz vegan cream cheese (Kite Hill recommended)
- 2 cups powdered sugar (sifted)
- 1 1/2 tsp vanilla essence
- 2-3 tbsp oat milk
Instructions
- Step 1: Preheat your oven to 350°F and line a 9×13 inch baking dish with parchment paper, leaving some overhang for easy removal. Remove eggs from the refrigerator to reach room temperature. Measure all ingredients before mixing.
- Step 2: In a medium bowl, whisk together flour, cocoa powder, salt, and espresso powder. Mix well to break up lumps and evenly distribute ingredients.
- Step 3: In a large bowl, whisk vegetable oil, sugar, vanilla essence, apple cider vinegar, and red food coloring until uniform in color with no streaks. Add eggs one at a time, whisking thoroughly after each addition.
- Step 4: Add dry ingredients from Step 2 to the wet mixture from Step 3. Stir just until combined to avoid tough brownies. Pour batter into prepared baking dish and smooth the top.
- Step 5: Bake for 25-30 minutes until a toothpick inserted near the center comes out with a few moist crumbs. Remove and let cool completely in the pan for 1-2 hours.
- Step 6: While brownies cool, beat vegan cream cheese, powdered sugar, and vanilla essence in a clean bowl on medium-high speed for 2-3 minutes until light and fluffy. Gradually add oat milk one tablespoon at a time until spreadable.
- Step 7: Spread the glaze evenly over cooled brownies using an offset spatula or spoon. Slice into squares and serve at room temperature, or refrigerate for 30 minutes for a firmer frosting.
Tips & Variations
- Using room temperature eggs helps create a tender crumb by improving emulsification.
- Espresso powder enhances the chocolate flavor without adding a coffee taste.
- Adjust red food coloring amount for a deeper or lighter red shade.
- Substitute oat milk with any plant-based milk you prefer for the glaze.
- For extra texture, fold in dairy-free chocolate chips before baking.
Storage
Store the brownies in an airtight container at room temperature for up to 3 days or refrigerate for up to a week. If refrigerated, allow brownies to come to room temperature before serving for the best flavor and texture. You can also freeze unfrosted brownies for up to 2 months; thaw completely before glazing.
How to Serve
Serve this delicious recipe with your favorite sides.
FAQs
Can I make these brownies without red food coloring?
Yes, you can omit the red food coloring, but the classic red velvet color will be missing. The brownies will still have rich flavor but appear more like traditional chocolate brownies.
Is it possible to make these gluten-free?
Yes, substitute the all-purpose flour with a gluten-free flour blend suitable for baking. Make sure the blend contains xanthan gum or add it separately to maintain the right texture.
PrintDelicious Dairy-Free Red Velvet Brownies Recipe
These delicious Dairy Free Red Velvet Brownies offer a rich, fudgy chocolate treat with a vibrant red color, topped with a creamy vegan cream cheese glaze. Perfectly moist and tender, these brownies combine the classic flavors of red velvet with dairy-free ingredients, making them suitable for those avoiding dairy without sacrificing flavor or texture.
- Prep Time: 15 minutes
- Cook Time: 25-30 minutes
- Total Time: 1 hour 45 minutes
- Yield: 16 brownies (9×13 inch pan) 1x
- Category: Dessert, Baked Goods
- Method: Baking
- Cuisine: American
- Diet: Vegan
Ingredients
For the Brownies:
- 3/4 cup vegetable oil
- 1 1/2 cups sugar
- 2 1/2 tsp vanilla essence (Nielsen-Massey preferred)
- 1 tbsp apple cider vinegar
- 2 tbsp red food coloring
- 3 eggs (room temperature, about 70°F)
- 1 3/4 cups all-purpose flour (King Arthur recommended)
- 5 tbsp cocoa powder
- 1/2 tsp salt
- 1/2 tsp espresso powder
For the Glaze:
- 3.5 oz vegan cream cheese (Kite Hill recommended)
- 2 cups powdered sugar (sifted)
- 1 1/2 tsp vanilla essence
- 2–3 tbsp oat milk
Instructions
- Preheat Oven and Prepare Pan: Preheat your oven to 350°F and line a 9×13 inch baking dish with parchment paper, leaving some overhang on the sides for easy removal. Remove eggs from the refrigerator to reach room temperature.
- Mix Dry Ingredients: In a medium bowl, whisk together the flour, cocoa powder, salt, and espresso powder. Ensure thorough mixing to prevent lumps and distribute ingredients evenly.
- Combine Wet Ingredients: In a large bowl, whisk vegetable oil, sugar, vanilla essence, apple cider vinegar, and red food coloring until uniform in color. Add eggs one at a time, whisking well after each addition.
- Combine Wet and Dry Mixtures: Add the dry ingredient mixture to the wet mixture and stir gently just until combined, avoiding overmixing to keep brownies tender.
- Bake the Brownies: Pour batter into the prepared baking dish and smooth the top with a spatula. Bake for 25-30 minutes until a toothpick inserted near the center comes out with a few moist crumbs, indicating fudgy texture.
- Cool the Brownies: Remove from oven and allow the brownies to cool completely in the baking dish at room temperature for 1-2 hours to set properly.
- Prepare the Glaze: In a clean bowl, beat vegan cream cheese, sifted powdered sugar, and vanilla essence on medium-high speed for 2-3 minutes until light and fluffy. Gradually add oat milk one tablespoon at a time until reaching a spreadable consistency.
- Frost the Brownies: Spread the glaze evenly over cooled brownies using an offset spatula or spoon. Create peaks and swirls as desired.
- Serve: Slice into squares and serve at room temperature, or refrigerate for 30 minutes for firmer frosting.
Notes
- Use room temperature eggs for better emulsification and a tender crumb.
- Espresso powder enhances chocolate flavor without adding coffee taste.
- Apple cider vinegar helps tenderize and deepen red velvet color.
- Do not overmix the batter to avoid tough brownies.
- Allow brownies to cool completely before frosting to ensure glaze sets properly.
- If a firmer frosting is desired, refrigerate brownies after glazing for 30 minutes.
- Sifting powdered sugar prevents lumps in the glaze for a smooth finish.
Keywords: Dairy Free Red Velvet Brownies, Vegan Brownies, Red Velvet Dessert, Dairy Free Dessert, Vegan Cream Cheese Frosting