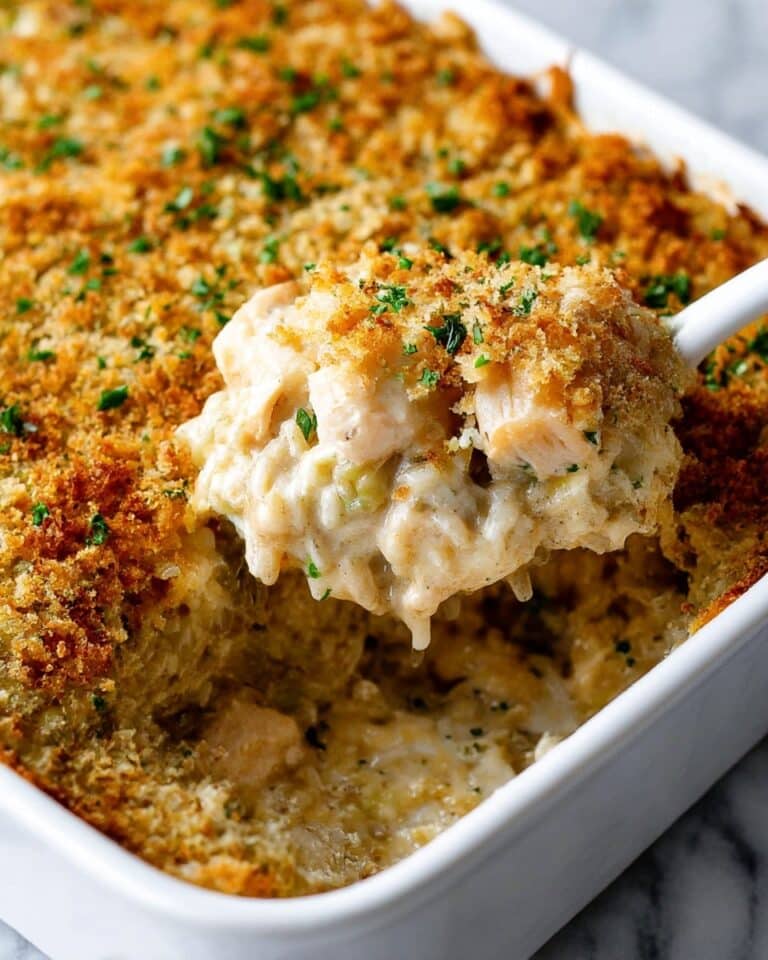
Canned Chicken Pot Pie Filling Recipe
Introduction
If you love the comforting taste of chicken pot pie but want to save time on busy nights, this canned chicken pot pie filling recipe is perfect for you. With just a few simple steps, you can prepare several jars of hearty filling ready to heat and serve anytime. It’s a versatile pantry staple that makes homemade dinners quick and easy.
Ingredients
- 7–8 cups boneless skinless cooked chicken (rotisserie chicken works great)
- 7 cups peeled and chopped red or Yukon Gold potatoes
- 5 cups peeled and chopped carrots
- 3½ cups chopped celery
- 3½ cups diced onion
- 3½ cups frozen peas
- 1 teaspoon salt per jar
- ¼ teaspoon dried thyme per jar (optional)
- 3 quarts broth or water (bone broth adds richness)
Instructions
- Step 1: Prepare your pressure canner by checking it is in good working condition and filling it with the recommended amount of water.
- Step 2: Wash seven quart jars thoroughly, inspect for cracks, and prepare new lids and rings.
- Step 3: Peel and chop potatoes into ½- to 1-inch cubes, dice onions and celery, and peel and chop carrots.
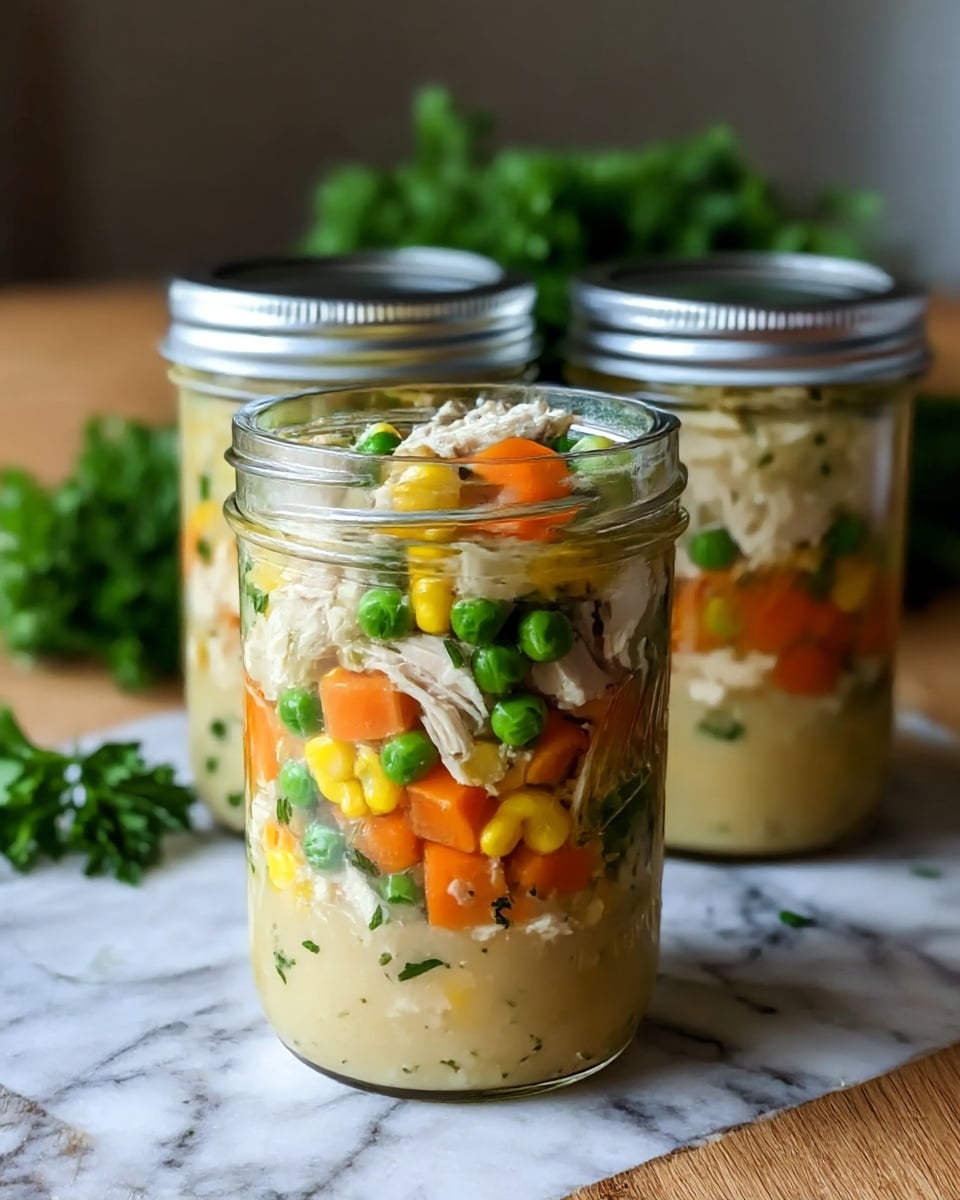
- Step 4: In each jar, add 1 teaspoon salt and ¼ teaspoon thyme. Then evenly layer 1 cup cooked chicken, 1 cup potatoes, ½ cup each carrots, celery, onion, and frozen peas.
- Step 5: Pour broth or water into each jar, leaving 1 inch of headspace. Remove air bubbles with a plastic utensil and wipe rims with vinegar-dampened cloth.
- Step 6: Place lids on jars and screw rings on finger-tight.
- Step 7: Load jars into the pressure canner, secure the lid, and vent steam for 10 minutes before adding weight.
- Step 8: Process at pressure for 90 minutes, maintaining consistent pressure throughout.
- Step 9: Turn off heat and allow canner to cool naturally before removing weight and lid.
- Step 10: Let jars rest in canner for 10 minutes, then transfer to a towel-lined surface to cool completely without tilting.
- Step 11: After 24 hours, remove rings and check seals. Store jars in a cool, dark place for up to two years.
Tips & Variations
- Adjust pressure canner weight based on your elevation to ensure safe processing.
- Use bone broth for richer flavor or clear broth/water to keep it light.
- Wipe jar rims with vinegar before sealing to improve seal security.
- Label jars with date for easy tracking and rotation.
Storage
Store your sealed jars in a cool, dark place for up to two years. Once opened, refrigerate leftover filling and use within 3–4 days. Reheat gently on the stove or in the microwave until hot before serving.
How to Serve

Serve this delicious recipe with your favorite sides.
FAQs
Can I use frozen vegetables instead of fresh?
Yes, frozen peas are already included in the recipe, and you can use frozen carrots or celery if fresh are not available, but fresh vegetables typically yield better texture.
Is pressure canning necessary for this recipe?
Yes, pressure canning is essential for safely preserving low-acid foods like chicken and vegetables to prevent harmful bacteria growth.
PrintCanned Chicken Pot Pie Filling Recipe

This Canned Chicken Pot Pie Filling recipe offers a convenient, shelf-stable solution for quick dinners. Featuring cooked chicken, potatoes, carrots, celery, onions, and peas in a savory broth, this hearty filling is pressure canned in quart jars to last up to two years. Perfect for homemade pot pies, casseroles, soups, or creative meals, it’s an ideal way to have a comforting, flavorful meal ready anytime without the hassle of daily prep.
- Prep Time: 30 minutes
- Cook Time: 1 hour 40 minutes (including 10 minutes venting, 90 minutes processing, plus cooling time)
- Total Time: 2 hours 10 minutes
- Yield: 7 quart jars 1x
- Category: Canning
- Method: Instant Pot
- Cuisine: American
Ingredients
Protein
- 7–8 cups boneless skinless cooked chicken (rotisserie chicken recommended)
Vegetables
- 7 cups peeled and chopped red or Yukon Gold potatoes (½-inch to 1-inch pieces)
- 5 cups peeled and chopped carrots
- 3½ cups chopped celery
- 3½ cups diced onions
- 3½ cups frozen peas
Seasonings
- 1 teaspoon salt per jar
- ¼ teaspoon dried thyme per jar (optional)
Liquid
- 3 quarts broth or water (bone broth for richness, clear broth or water for lighter filling)
Instructions
- Prep Your Pressure Canner: Ensure your pressure canner is clean and in good working order by checking its rubber seal ring, vents, and bottom metal plate. Fill it with the appropriate amount of water—about 3 quarts for a standard Presto pressure canner.
- Prepare Your Jars: Thoroughly wash seven quart jars and inspect for cracks. Use new lids and clean rings to guarantee a proper seal after canning.
- Chop and Prep Ingredients: Peel and cube potatoes to about ½ to 1 inch. Dice onions and celery finely. Peel and chop carrots into uniform pieces to ensure even cooking in the canning process.
- Fill the Jars: Place 1 teaspoon of salt and ¼ teaspoon of dried thyme (if using) inside each jar. Add per jar: 1 cup cooked chicken, 1 cup potatoes, ½ cup carrots, ½ cup celery, ½ cup onion, and ½ cup frozen peas. Pour broth or water over the ingredients, leaving 1 inch of headspace to allow for expansion during processing.
- Remove Air Bubbles: Use a plastic utensil or butter knife to gently press around the ingredients inside the jar to release trapped air bubbles. Wipe jar rims with a vinegar-dampened cloth to remove any residue that might interfere with sealing.
- Seal the Jars: Place clean lids on the jars and screw on the rings just until fingertip-tight to avoid over-tightening, which could prevent proper vacuum sealing.
- Load the Canner: Place the prepared jars into the pressure canner carefully. Secure and lock the lid.
- Vent Steam: Heat the canner on medium-high and allow steam to vent continuously for 10 minutes through the vent pipe before adding the weight or pressure valve. This step removes air from the canner to ensure proper pressurization.
- Process at Pressure: Once the canner reaches the correct pressure level (indicated by the weight jiggle), start a timer and process for 90 minutes. Keep pressure constant throughout this time to ensure safe sterilization.
- Cool Down Naturally: After 90 minutes, turn off the heat and let the canner depressurize naturally without forcing it open. Wait until the pressure indicator drops on its own before removing the weight and unlocking the lid.
- Remove Jars Carefully: Let the jars sit inside the canner for 10 minutes post-processing to avoid sudden temperature changes. Then remove and place them on a towel-lined counter, keeping them upright and undisturbed while cooling.
- Check Seals and Store: After 24 hours, remove the screw bands and verify that the lids have sealed by pressing the centers (they should not flex up and down). Store sealed jars in a cool, dark place for up to two years for optimal flavor and safety.
Notes
- Adjust the pressure canning weight according to your elevation to guarantee proper sterilization: consult pressure canning guidelines based on altitude.
- Using bone broth enriches the flavor compared to clear broth or water, but choose based on your preference and dietary needs.
- Cleaning the jar rims with vinegar before sealing helps achieve a strong vacuum seal every time.
- Label each jar with the date of canning to keep track of freshness and use within the recommended two-year shelf life.
- Avoid tipping or moving jars while they cool to prevent seal failure.
Keywords: chicken pot pie filling, canned dinner, home canning, pressure canning recipe, comfort food, meal prep, pantry meals, chicken recipes