Zucchini Scarpaccia Delight: A Flavorful Italian Treat Recipe
Introduction
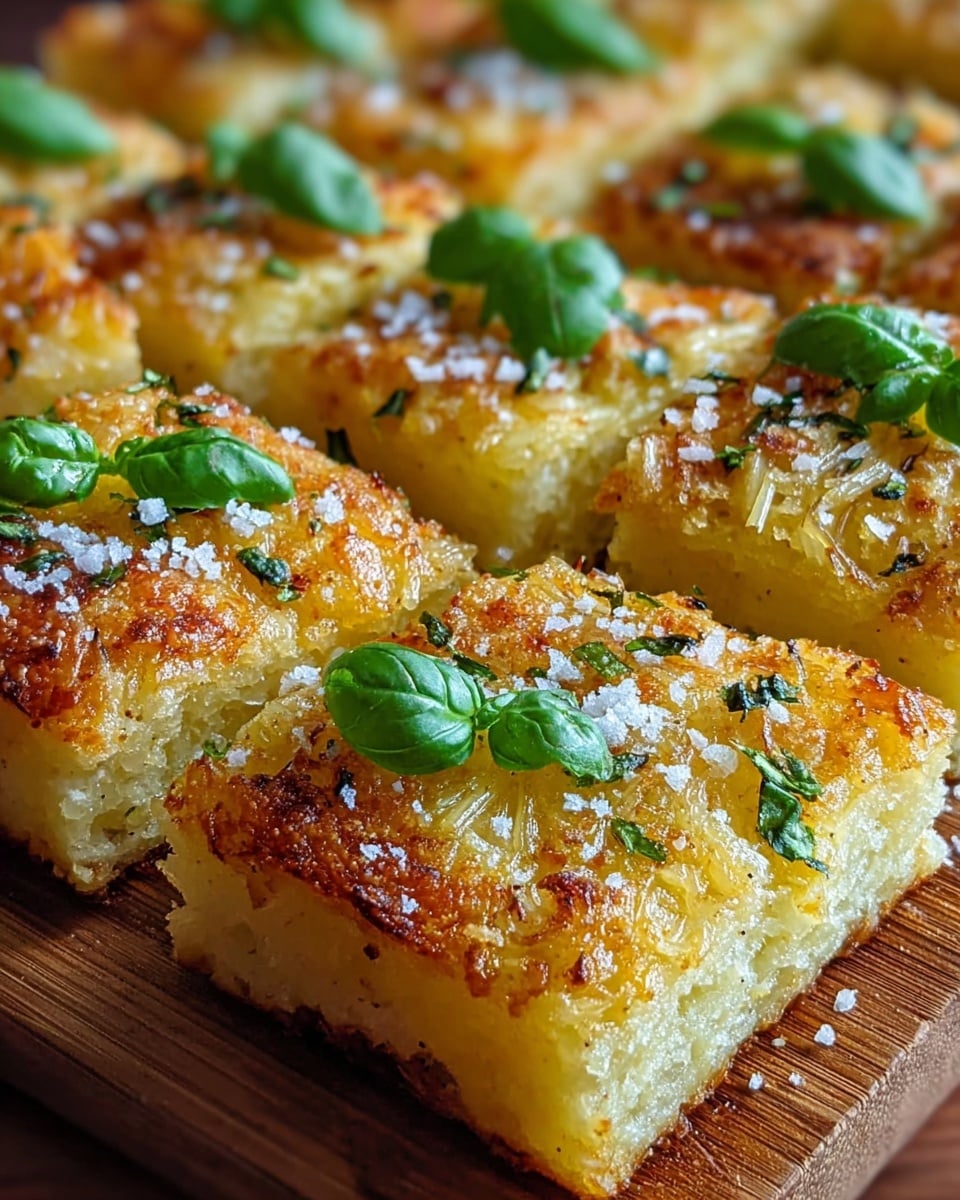
Zucchini Scarpaccia Delight is a simple yet flavorful Italian treat that showcases fresh zucchini in a light, airy batter. This dish offers a crispy crust with a tender interior, enhanced by lemon zest and fresh herbs for a bright, aromatic finish.

Ingredients
- 2 medium zucchini (about 300 g)
- 1 ½ cups all‑purpose flour
- 2 large eggs
- ¼ cup whole‑milk (or plant‑based milk)
- Zest of 1 lemon
- 2 tablespoons fresh parsley, chopped
- 1 teaspoon sea salt
- ¼ teaspoon freshly ground black pepper
- 3 tablespoons extra‑virgin olive oil
- Optional: ¼ cup grated Parmesan cheese
Instructions
- Step 1: Wash the zucchini and grate them using the medium holes of a box grater. Place the grated zucchini in a clean kitchen towel and squeeze firmly to remove excess moisture. Transfer the dried zucchini to a large mixing bowl.
- Step 2: Add the flour, sea salt, and black pepper to the bowl with zucchini. Toss gently to coat the vegetables evenly and prevent clumps.
- Step 3: In a separate cup, whisk together the eggs, milk, and lemon zest. Pour this liquid mixture over the dry ingredients and stir until just combined; a few small lumps are fine.
- Step 4: Sprinkle the chopped parsley and optional Parmesan cheese into the batter. Fold gently to evenly distribute without over-mixing.
- Step 5: Heat a 10-inch non-stick skillet over medium-high heat. Add 2 tablespoons of olive oil and swirl to coat. The oil should shimmer but not smoke, about 3 minutes.
- Step 6: Spoon the batter into the hot skillet and spread it evenly into a ½-inch layer using a spatula. The edges should sizzle immediately, forming a thin crust.
- Step 7: Cook undisturbed for 4-5 minutes until the bottom is golden brown and releases easily from the pan.
- Step 8: Transfer the skillet to a preheated oven at 375°F (190°C). Bake for 12-15 minutes until the top is puffed, lightly golden, and a toothpick inserted in the center comes out clean.
- Step 9: Remove from the oven and let the scarpaccia rest for 3 minutes. Drizzle the remaining tablespoon of olive oil over the top, slice into wedges, and serve warm.
Tips & Variations
- Be sure to remove excess moisture from the zucchini to ensure a crisp crust and prevent sogginess.
- Try adding other fresh herbs like basil or thyme for a different flavor twist.
- For a dairy-free version, omit Parmesan and use plant-based milk.
- Serve with a light salad or a dollop of ricotta for a complete meal.
Storage
Store any leftover scarpaccia in an airtight container in the refrigerator for up to 2 days. Reheat gently in a skillet over low heat to restore crispness, or warm briefly in a 350°F (175°C) oven. Avoid microwaving to prevent sogginess.
How to Serve
Serve this delicious recipe with your favorite sides.
FAQs
Can I use yellow squash instead of zucchini?
Yes, yellow squash works well as a substitute and offers a similar texture and mild flavor.
Is it necessary to finish cooking the scarpaccia in the oven?
Finishing in the oven ensures the top cooks evenly and sets properly, creating the characteristic puffed and golden finish. Skipping this step may result in a less cooked center.
PrintZucchini Scarpaccia Delight: A Flavorful Italian Treat Recipe

Zucchini Scarpaccia Delight is a traditional Italian savory pancake featuring fresh zucchini, a light batter, and fragrant lemon zest and herbs. This dish combines a crisp golden crust with a moist, airy interior, enhanced by a drizzle of extra-virgin olive oil and an optional touch of Parmesan cheese for added richness. Perfect as a flavorful appetizer or light meal, this recipe brings a fresh, vibrant taste of Italy to your table.
- Prep Time: 15 minutes
- Cook Time: 22 minutes
- Total Time: 37 minutes
- Yield: 4 servings 1x
- Category: Appetizer
- Method: Stovetop and Baking
- Cuisine: Italian
- Diet: Vegetarian
Ingredients
Main Ingredients
- 2 medium zucchini (about 300 g)
- 1 ½ cups all‑purpose flour
- 2 large eggs
- ¼ cup whole‑milk or plant‑based milk
Flavor Boosters
- Zest of 1 lemon
- 2 tablespoons fresh parsley, chopped
- 1 teaspoon sea salt
- ¼ teaspoon freshly ground black pepper
Cooking Essentials
- 3 tablespoons extra‑virgin olive oil
- Optional: ¼ cup grated Parmesan cheese
Instructions
- Preparing the Base: Wash the zucchini thoroughly and grate them using the medium holes of a box grater. Place the grated zucchini into a clean kitchen towel and squeeze firmly to remove as much moisture as possible. This step ensures your scarpaccia will have a crispy crust. Transfer the dried zucchini to a large mixing bowl.
- Mixing the Batter: Add the flour, sea salt, and freshly ground black pepper to the bowl with the zucchini. Toss gently to coat the zucchini evenly and prevent clumping. In a separate cup, whisk together the eggs, milk, and lemon zest until combined. Pour this liquid mixture over the dry ingredients and stir gently until just combined; it’s okay if the batter has a few small lumps. Fold in the chopped parsley and, if using, the grated Parmesan cheese carefully to keep the herbs vibrant and distribute the cheese evenly without over-mixing.
- Cooking the Scarpaccia – Skillet Searing: Heat a 10-inch non-stick skillet over medium-high heat. Add 2 tablespoons of the olive oil and swirl to coat the bottom of the skillet. The oil should shimmer but not smoke, which takes about 3 minutes. Spoon the batter into the hot skillet and spread it evenly to create a ½-inch thick layer. The edges will start sizzling immediately to form a crust.
- Sear the Bottom: Let the batter cook undisturbed for 4 to 5 minutes until the underside turns a golden brown and releases easily from the pan surface, forming a flavorful crust.
- Finish in the Oven: Carefully transfer the skillet to a preheated oven set to 375°F (190°C). Bake the scarpaccia for 12 to 15 minutes, or until the top is puffed up, lightly golden, and a toothpick inserted in the center comes out clean, signaling it is cooked through.
- Rest and Serve: Remove the skillet from the oven and allow the scarpaccia to rest for 3 minutes. Drizzle the final tablespoon of extra-virgin olive oil over the top to add richness and shine. Slice into wedges and serve warm for a delightful Italian treat.
Notes
- Removing excess moisture from the zucchini is essential for a crispy crust.
- Parmesan cheese is optional but adds a nice savory depth.
- Use a non-stick skillet to prevent sticking during searing.
- For a dairy-free version, substitute milk with plant-based alternatives and omit Parmesan.
- Letting the scarpaccia rest before serving enhances flavor and texture.
Keywords: zucchini scarpaccia, Italian savory pancake, zucchini recipe, vegetarian appetizer, Italian treat, baked zucchini pancake